Quantcast
Channel: Zimbra – Vavai's Personal Notes
Viewing all 40 articles
Browse latest View live

Upgrading Zimbra Mail Server 6.x.x into Zimbra Mail Server 7.x.x

$
0
0

Zimbra has released Zimbra 7 for about a month and it seems quite stable for production use. As major upgrade to Zimbra 6, Zimbra 7 comes with tons of bug fixes and new features including security feature to prevent virus and spam.

Does the upgrade process should be applied for production use ? The answer depends on your environment. If an existing system quite stable with minor problem, you may stick with your existing Zimbra system but if you need some features that only provided by Zimbra 7, upgrading may be the best option. I’m currently manages some Zimbra for production mail server system on some client, most of them are corporate with user 100-10k users.

If you wish to upgrading  Zimbra 6.x.x into Zimbra 7.x.x, below are some notes to make upgrading process works successfully. Upgrade process took about 30 minutes on system with 8 GB of RAM

  1. Full Backup. Backup is a must, especially for major upgrade from Zimbra 6 to Zimbra 7. Backup all your  /opt/zimbra to a backup media. It’s a preventive tasks, as an emergency option in case upgrade process doesn’t work as expected.
  2. Write a Notes for Custom Modification. Upgrading process will remove all custom modification to Zimbra system, including DomainKeys/DKIM, PolicyD, Postfix Restrict Recipient, RBL override, custome Postfix tweaks, etc
  3. Download & Read Release Notes Carefully. Release notes can be obtained from  : http://www.zimbra.com/downloads/os-downloads.html. Read it carefully, especially for pre, on and post install tips.
  4. Update MySQL Database. Zimbra bypassing this process because this process will took a much longer time, depending MySQL database size. Although the bypass process will not messed up email sending and receiving,  Zimbra will issued an error for  database integrity report as below :
    Database errors found.
    /opt/zimbra/mysql/bin/mysqlcheck --defaults-file=/opt/zimbra/conf/my.cnf -S /opt/zimbra/db/mysql.sock -A -C -s -u root --password=XtfabvSktqwZBQKFU5J.vAJ8QQUpssqi
    mboxgroup1.appointment
     error    : Table upgrade required. Please do "REPAIR TABLE `appointment`" or dump/reload to fix it!
     mboxgroup1.data_source_item
     error    : Table upgrade required. Please do "REPAIR TABLE `data_source_item`" or dump/reload to fix it!
     mboxgroup1.imap_folder
     error    : Table upgrade required. Please do "REPAIR TABLE `imap_folder`" or dump/reload to fix it!
     mboxgroup1.mail_item
     error    : Table upgrade required. Please do "REPAIR TABLE `mail_item`" or dump/reload to fix it!
     mboxgroup1.pop3_message
     error    : Table upgrade required. Please do "REPAIR TABLE `pop3_message`" or dump/reload to fix it!

    To resolve this problem, run following command from konsole/terminal :

    /opt/zimbra/libexec/scripts/migrate20100913-Mysql51.pl

    The above command will invoke Zimbra to updating  MySQL database from Zimbra 6.x.x database schema

  5. Optional : Authorizing Zimbra MTA. If your Zimbra server could not send an email after upgrade, run the following command :
    sudo /opt/zimbra/bin/zmprov –m –l yourZimbra.server.com zimbraMtaAuthHost yourZimbra.server.com

    Note : the above command are optional, you do not need to execute the command if your Zimbra server doesn’t have any problem for sending and receiving email.

Fully tested upgrading Zimbra 6.0.10 to Zimbra 7.1.0 on SUSE Linux Enterprise Server 11 SP1 64 bit.


Installing RapidSSL Certificate on Zimbra Mail Server

$
0
0

By default, Zimbra create and installing Self-Signed Certificate on installation process for https transport protocol. Self-signed certificate used for Apache jetty web server (both Zimbra webmail and Administration console), POP3 SSL, SMTP SSL and IMAP SSL. Self-Signed certificate doesn’t automatically trusted because the certificate was not issued & certify by authorized SSL certificate provider such as Verisign, Cybertrust, Godaddy, RapidSSL, etc.

Below are step-by-step how to install RapidSSL certificate on Zimbra Mail Server

  1. Open Zimbra Administration Console, go to Tools | Certificate menu and then click on Install Certificate link
  2. Follow the Certificate creation wizard. On Second wizard windows, choose Generate the CSR for the commercial certificate authorizer options and then click on Next button until final wizard windows. Don’t forget to fill in an appropriate entry to the certificate fields.
  3. On final wizard, click on Download the CSR link
  4. Buy an SSL certificate from RapidSSL and use the downloaded CSR on the above process as required by RapidSSL. RapidSSL will send us the webserver and intermediate certificate
  5. Create a blank-text file /tmp/zcsserver.crt. Copy-paste all of webserver certificate content from RapidSSL including Begin Certificate and End Certificate line into /tmp/zcsserver.crt.
  6. Run the following command :
    cd /tmp
    wget http://www.geotrust.com/resources/root_certificates/certificates/GeoTrust_Global_CA.cer
    wget https://knowledge.rapidssl.com/library/VERISIGN/ALL_OTHER/RapidSSL%20Intermediate/RapidSSL_CA_bundle.pem
    cat GeoTrust_Global_CA.cer RapidSSL_CA_bundle.pem > /tmp/ca_bundle.crt
    cd /opt/zimbra/bin
    ./zmcertmgr deploycrt comm /tmp/zcsserver.crt /tmp/ca_bundle.crt
    chmod 644 /opt/zimbra/java/jre/lib/security/cacerts
    /opt/zimbra/java/bin/keytool -import -alias rapidsslintca -keystore /opt/zimbra/java/jre/lib/security/cacerts -storepass changeit -file /tmp/RapidSSL_CA_bundle.pem
    su - zimbra
    zmcontrol restart
    

    changeit on the above line is the default password for Mailbox truststore. If you wish to verify the correct password, check it with the following command :

    su - zimbra
    zmlocalconfig -s | grep mailboxd_truststore_password
    
  7. Check your Zimbra Mail Server with https protocol and make sure that certificate was installed sucessfully

Note : If you wish to replace the words Which is run by (unknown) to an appropriate organization name, buy the premium or advanced SSL certificate. Premium or Advanced SSL certificate is more expensive than standard SSL certificate and need a document from your organization to be verified by SSL certificate provider

SUSE Linux Enterprise Server 11 SP1 Minimal Server Appliance

$
0
0

I’m currently working as an IT system integrator on a small company based on Bekasi, a small town near Jakarta Indonesia. The company founded by me and my young brother and covering on various jobs regarding server setting, implementation, maintenance and workshop/training.

At first, installing server is an interesting jobs but after similar works on some client, I feel bored with the process, ie :

  1. Virtualization Server (VMWare, KVM, OpenVZ, Xen, etc) Installation
  2. Server OS installation
  3. Application Installation
  4. Customizing the configuration

I think I could reduce the time for processing the above task by making an appliance using SUSE Studio. An appliance will contains my default server setup and all of packages required by application. The results are Minimal Server Appliance.

Minimal Server Appliance based on SUSE Linux Enterprise Server 11 SP1 64 bit Just Enough Operating System (JeOS). It has all minimal server package with DRBD+Heartbeat from High Availability Extension (HAE) Addons.

The Appliance was successfully tested to running Zimbra Collaboration Suite 7.×.x (latest testing with Zimbra 7.1.3) on VMWare ESXi, Proxmox VE, VirtualBox and KVM Virtualization. Use the following user name and password credentials to make modification to the appliance configuration :

User Name : root
Password : opensuse

By using this application I can reduce the installation time to just a few minutes only. If you wish to make some modification, feel free to clone the appliance and making your own.

Notes from latest releases :

001 : Change Appliance Size to 50 GB (Dynamic Size)
002 : Add netcat package, required by Zimbra zmconfigd
003 : Add Indonesian Local Mirror for SLES 11 SP1 64 bit
004 : Add imapsync package for mail migration and synchronization
005 : Add nmap package for port tracking
006 : Add opendkim package for Zimbra DKIM signature
007 : Add ntp and yast2-ntp-client for time synchronization
008 : Add sqlite3 package, required by Zimbra 7.×.x

I’m intended and mostly using the appliance for Zimbra mail server deployment on top of SLES 11 SP1 64 bit but the appliance itself could be setting up as web server, database server, proxy server, file server, etc.

Minimal Server Appliance available on ISO LiveCD, Preload ISO for physical server deployment and Virtual Image (OVF and VMX extension) for virtual server deployment.

Please let me know if you found any bugs regarding the appliance.

Zimbra Mail Server Tips : Bulk Reset Account Password

$
0
0

Sometimes we may want to reset the user password for a while, such as setting up a new system or migration from the old mail server and want to clean up old password.

Below are a simple script to bulk-reset Zimbra account password :

#!/bin/bash
clear
USERS=`su - zimbra -c 'zmprov -l gaa'`;

for ACCOUNT in $USERS; do
ACC1=`echo $ACCOUNT | awk -F@ '{print $1}'`;
ACC=`echo $ACC1 | cut -d '.' -f1`;

if [ $ACC == "admin" ] || [ $ACC == "wiki" ] || [ $ACC == "galsync" ] || [ $ACC == "ham" ] || [ $ACC == "spam" ]; then
echo "Skipping system account, $NAME...";
else
echo "Modifying $ACCOUNT password...";
su - zimbra -c "zmprov sp $ACCOUNT NewGeneratedPassword";
su - zimbra -c "zmprov ma $ACCOUNT zimbraPasswordMustChange TRUE;
echo "Done!"
echo ""
# read anykey
fi
done
echo "Modifying password for all user has been finished successfully"

Note : I think it would be better to include some personal ID (part of user name or any fields) into generated-password so all password will be a semi-random password. In my case, I’m using user birth date or part of their name for their generated password to prevent anyone trying to login to any mailbox. It’s not really secure but in my case, it was sufficient for temporary purpose.

openSUSE/SLES Tips : Imapsync installation for Email Backup & Synchronization

$
0
0

Imapsync is a tool for facilitating incremental recursive IMAP transfers from one mailbox to another. It is useful for mailbox migration or backup, and reduces the amount of data transferred by only copying messages that are not present on both servers. Read, unread, and deleted flags are preserved, and the process can be stopped and resumed. The original messages can optionally be deleted after a successful transfer.

Imapsync is one very useful tool because it can be used to perform backup and synchronization of all email content, both structure and content. For example, if we have an inbox, sent items, drafts, trash, etc in the old mail server, we can copy the structure and content seamlessly into the new mail server. Imapsync even able to backup a folder other than the default folder, such as copying a folder called “Vavai” and “Urgent”, etc inside my inbox folder.

The following tutorial is the process of installation and usage of Imapsync on SUSE Linux Enterprise Server 11 SP 1, although Imapsync can be run in almost all Linux systems.

INSTALLATION

Run the following command via the console / terminal:

zypper ar http://download.opensuse.org/repositories/devel:/languages:/perl/SLE_11 perl
http://download.opensuse.org/repositories/home:/pheinlein/SLE_11_SP1/ imapsync
zypper ref
zypper in imapsync perl-Date-Manip perl-Mail-IMAPClient

Note : I’m using package on openSUSE Build Services to install Imapsync. Do not forget to change the version and type of openSUSE distribution in accordance with your running system.

USAGE

Here is an example of using Imapsync to synchronize a mailbox from the mail server with an IP 192.168.10.2 to the mail server with an IP 192.168.10.1 (Imapsync can also use server hostname instead of ip address):

imapsync - host1 192.168.10.2 - user1 budi@namadomain.com - passwordbudi password1 - host2 192.168.10.1 - vavai@namadomain.co.id user2 - password2 passwordvavai - noauthmd5 -ssl1 -ssl2

The above command will copy the mailbox budi@namadomain.com on server 192.168.10.2 to the mailbox vavai@namadomain.co.id on server 192.168.10.1.

Let’s see the user account between primary server and secondary server. As you may notices, Imapsync can be used to copy the email user A to the same mailbox on another server or to a different mailbox on another server

NOTE:

  1. - – follows by words are Imapsync parameters. –user1 budi@namadomain.com means that user account in first server is budi@namadomain.com
  2. Imapsync can be used to synchronize all mail server that supports the IMAP protocol (as the name implies, Imapsync, not POPsync especially lipsync :-P ), so it can be used on Postfix+Imap, Sendmail + Imap, Qmail+Imap, MDaemon, Microsoft Exchange etc
  3. Imapsync requires a password for each account to be successfully synchronized.
  4. Imapsync is able to synchronize the password if we know both accounts and password. We have to equate all the passwords if you want to easily synchronize with the command above. Oon some mail servers, we can use Imapsync with the – -authuser to access user mailboxes by using admin privileges.

Installing Zimbra Mail Server on SLES 11 SP1 64 bit in less than 30 Minutes-Part 1

$
0
0

The following article will explain about the quick and easy tutorial : how to installing Zimbra Mail Server on SUSE Linux Enterprise Server 11 SP1 64 bit. I will use the Minimal Server Appliance in this tutorial to simplify the installation process. Here are some notes related to the server setting :

  1. WARNING : This guide using Preload ISO and will erase the entire contents of hard disk!  If you do not want to delete your existing data, consider using Virtualization server or use ISO-LiveCD.
  2. Zimbra server will be using a private IP which will be translated into public IP using NAT
  3. Zimbra will be setting up using Split-DNS concept. This means that in the internal network, mail server will be recognized based on a private IP network, while from the outside will be recognized based on the public IP. For this purpose, the internal DNS will be set up in Zimbra Mail Server
  4. Zimbra Fully Qualified Domain Name : mail.vavai.net, private IP : 192.168.1.250

I. DOWNLOAD MINIMAL SERVER

Estimated time : 5 minutes
  1. Download Minimal Server Appliance, choose Harddisk/Preload ISO appliance type
    `
  2. Burn the ISO onto blank CD

II. BASIC SERVER INSTALLATION

Estimated time : 5 minutes
  1. Turn on the computer with a CD/DVD ROM as first boot option
  2. You will be greeted with the first appearance of Appliance. Select the menu: “Install/Restore Minimal Server Appliance” and press ENTER
    `
  3. Click Yes on the choice : “Destroying ALL data on /dev/sdx, Continue?”. WARNING, think before act! :-)
    `
  4. Minimal Server Appliance will be installed to the physical machine.
    `
  5. Minimal Server Appliance will automatically run after the installation process is complete. Type Y at the question : “Do you Accept the EULA?”
    `
  6. Login with user name : root and password : opensuse.
    `

III. INITIAL CONFIGURATION (NETWORK)

Estimated time : 3 minutes

  1.  Type: YaST lan on the console/terminal to starting network configuration using YAST
    `
  2. Press ALT+I to configure network card. Fill in the IP address, subnet mask and hostname. Note : The letters in yellow can be accessed by pressing ALT + the letter. You can also using tab to switch between one option to another option
    `
  3. Click Next and then move to Hostname & DNStab. Setup your hostname, your domain, Name Server 1,2 & 3 and domain search. Remember that I am using split DNS and create a local DNS server so Name Server 1 =  Zimbra Server, Name Server 2 = My Router and Name Server 3 = Public DNS Server (OpenDNS . You can also use Google’s DNS-8.8.8.8-on Name Server 3
    `
    zimbra-opensuse112-13
  4. Move to Routing tab and fill the Default Gateway with  your router address
    `
  5. Press ALT+O or press on OK to close and update your network configuration

Installing Zimbra Mail Server on SLES 11 SP1 64 bit in less than 30 Minutes-Part 2

$
0
0

Previous tutorial : “Installing Zimbra Mail Server on SLES 11 SP1 64 bit in less than 30 Minutes-Part 1″

Note : I’m using YaST for openSUSE screenshot because I already have it. However, there should no significant difference between a screenshot with YAST configuration on SLES

IV. CONFIGURING LOCAL DNS SERVER

Estimated time : 3 minutes

Zimbra need an A & MX records that pointing to it’s IP Address. We could use/modify existing DNS records to meet with our requirement but I would prefer to installing local DNS server for it’s flexibility. If you’re currently using an existing & running mail server and need to replace it with Zimbra, you should not change any MX entry before completing and testing the configuration. Incomplete configuration on production mail server may impact to bounce mail, so, we need a local DNS server to prevent the impact and to do a full test before activating mail server for production use.

Setting up a DNS server on openSUSE for Zimbra requirement should be easy by using YAST. Below is a step by step, please change the IP and host name to meet with your environment on previous tutorial.

  1. Type : yast dns-server on the console/terminal
  2. Click Next on first configuration wizard : Forwarder List

    DNS Server wizard : Initial Windows

    DNS Server wizard : Initial Windows

  3. Add a new Zone. Typing your domain name on Zone name, choose Masteron type of zone and then click Add (ALT+A)

    Add DNS Zone

    Add DNS Zone

  4. Press ALT+I (Edit) to modify your zone
    `
    zimbra-opensuse112-19
  5. Just leave the first tab (Basics) as is. Press ALT+D to move to the second tab : NS Records
  6. Write ns1 on Name Server to Add option and then press ALT+A to add the records. YAST will be smart enough to autocompleting the entry and give a fully qualified domain name to the records
    `
    zimbra-opensuse112-20
  7. Press ALT+X to move to the third tab, MX Records. Fill in mail as Zimbra host name (see your configuration on first tutorial) on Address option, Give it a priority number (lower means highest priority) and then Press ALT+A to add MX records. Again, YAST will be smart enough to autocompleting the entry and give a fully qualified domain name to the MX records
    `
    zimbra-opensuse112-21
  8. Leave the fourth tab as is, except you need to modify to SOA option
  9. Move to final tab. Type : ns1 on Record key, choose A (Address Records) as records type and write Zimbra IP on records value and then press ALT+A to Add the records. Still on the final tab (Records), create the second Address Records for Zimbra hostname. Type mail on Record key, choose A (Address Records) as records type and write Zimbra IP on records value and then press ALT+A to add the mail Address Records
    `
    zimbra-opensuse112-22
  10. Press ALT+O (OK)
  11. Press ALT+N to go to the next wizard
  12. Press ALT+S to Choose On : Start up now and When Booting and then press ALT+F  to completing DNS configuration. This will ensure that DNS service will be active on start up
    `
    zimbra-opensuse112-23
  13. Restarting DNS Service by running the command : service named restart on console/terminal
  14. Testing the DNS records using dig and nslookup : nslookup ns1.domain.tld and nslookup mail.domain.tld. if the setting is done correctly, DNS Server will respond with the Zimbra IP.
    `

    `
    zimbra-opensuse112-24
  15. Here is my DNS server configurations that can be accessed on the file /var/lib/named/master/vavai.net
    `

Continue to the third part : Installing Zimbra Mail Server on SLES 11 SP1 64 bit in less than 30 Minutes-Part 3

Installing Zimbra Mail Server on SLES 11 SP1 64 bit in less than 30 Minutes-Part 3

$
0
0

Previous tutorial : “Installing Zimbra Mail Server on SLES 11 SP1 64 bit in less than 30 Minutes-Part 2″

V. INSTALLING ZIMBRA
Estimated Time : 10 minutes

Minimal server appliance has all required package for installing Zimbra. Postfix and all other applications that could potentially conflict with Zimbra package deactivated automatically on initial boot. You do not need to install additional package because all necessary package is bundled inside the appliance.

  1. Go to folder /opt, download Zimbra binary installer from  Zimbra Website (At this writing, zimbra latest version is version 7.1.3), uncompress and then run the setup installer
    cd /opt
    wget -c http://files.zimbra.com/downloads/7.1.3_GA/zcs-7.1.3_GA_3346.SLES11_64.20110930001521.tgz
    tar -zxvf zcs-7.1.3_GA_3346.SLES11_64.20110930001521.tgz
    cd zcs-7.1.3_GA_3346.SLES11_64.20110930001521
    ./setup.sh
    

    `

  2. Answer the question “Do you agree with the terms of the software license agreement? [N]“ with Y. Off course, because if you answer N, the installation process will simply stopped successfully :-P
  3. Press ENTER for all installation package. The default answer is Y. Leave the “zimbra-memcached” and “zimbra-proxy” as is (will not be install) because zimbra-memcached and zimbra-proxy only required for multi server installation.
    `
  4. Zimbra will install the required application package and at the end will be check DNS records. On the DNS confirmation : “DNS ERROR resolving MX for mail.vavai.net
    It is suggested that the domain name have an MX record configured in DNS
    Change domain name? [Yes]“. Just answer “Y” for change domain and then typing your domain name (in my case : vavai.net) instead of your hostname (mail.vavai.net)
    `
  5. Press 3  on the question “Address unconfigured (**) items  (? – help)” and press 4 on the question “Select, or ‘r’ for previous menu [r]“ to change the default password for Zimbra Admin
  6. Fill in Zimbra Admin password. Note : Password will be displayed on plain text
  7. Press ENTER on question “Select, or ‘r’ for previous menu [r]“
  8. Press A on question “*** CONFIGURATION COMPLETE – press ‘a’ to apply
    Select from menu, or press ‘a’ to apply config (? – help)” and then press ENTER twice, following with “Y” and then  press ENTER on question “The system will be modified – continue? [No]“
    `
  9. Zimbra will perform the system installation process. Please be patient :-) . The installation will took 5-10 minutes depending your server performance (processor and memory)
  10. Zimbra Open Source Edition will asking an optional registering your installation for statistics purpose only. Answer for this question are up to you :-)
    You have the option of notifying Zimbra of your installation.
    This helps us to track the uptake of the Zimbra Collaboration Suite.
    The only information that will be transmitted is:
    The VERSION of zcs installed (7.1.3_GA_3346_SLES11_64)
    The ADMIN EMAIL ADDRESS created (admin@vavai.net)Notify Zimbra of your installation? [Yes]
    
  11. Installation is complete, run the command :
    su - zimbra
    zmcontrol -v
    zmcontrol status
    

    `

  12. Open the browser and go to http://your-zimbra-server-ip (in my case : http://192.168.1.250) or http://zimbra-hostname (in my case : http://mail.vavai.net) to access Zimbra Webmail
    `
  13. Zimbra management can be done using the web admin with https protocol and default port 7071 : https://192.168.1.250:7071 or https://mail.vavai.net:7071

VI. SUMMARY

Zimbra Installation is very easy and requires a short time if we use the right tools. It can be done by using an appliance to simplify the installation process because I’ve prepare all the Zimbra requirement packages to the appliance and remove unnecessary application.

Hopefully this is useful for anyone who needs it. Warm regards from Jakarta-Indonesia ;-)


Tips : Export-Import Zimbra Account Data Into LDAP Data

$
0
0

About 2-3 month ago, Excellent team was invited by a government institution in Bogor, Indonesia, to setup Zimbra Mail Server and upgrade an existing Zimbra mail server to use external LDAP authentication. Although Zimbra itself already using LDAP, our client asked me to setup a separated LDAP Server. This server will  be used as a central account/authentication server for  SSO/Single Sign On

Configuring LDAP Server using SUSE Linux Enterprise Server (SLES) or openSUSE is not too difficult because YAST has it’s own module to be configure via YAST | Network Services | LDAP Server menu. The difficult part is to import the Zimbra account data into an LDIF file that can be imported to the SLES LDAP server.

Below is the script modified from articles Script for Export-Import Zimbra Account + Password. I modify the script to insert some attribute, such as home directory, GID, UID and others required by Posix Schema.

#!/bin/sh

#Hapus Layar
clear

echo -e "###################################################################################"
echo -e "# Zimbra export-ldap.sh ver 0.0.1                                                 #"
echo -e "# Skrip untuk export account Zimbra berikut profile dan password                  #"
echo -e "# Masim 'Vavai' Sugianto - vavai@vavai.com - http://www.vavai.com                 #"
echo -e "# PT. Excellent Infotama Kreasindo : http://www.excellent.co.id                   #"
echo -e "###################################################################################"

# /* Variable untuk bold */
ibold="\033[1m""\n===> "
ebold="\033[0m"

# /* Parameter */
echo ""
echo -n "Enter Domain Name (ex : vavai.com) : "
read NAMA_DOMAIN
echo -n "Enter path folder for exported account (ex : /home/vavai/) : "
read FOLDER

# /* Membuat file hasil export dan mengisi nama domain */
MOD_FILE="$FOLDER/zcs-acc-mod.ldif"
LDIF_FILE="$FOLDER/acc-add.ldif"

vUID=1004

rm -f $MOD_FILE
rm -f $LDIF_FILE

touch $MOD_FILE
touch $LDIF_FILE


# /* Check versi Zimbra yang digunakan */
VERSION=`su - zimbra -c 'zmcontrol -v'`;
ZCS_VER="/tmp/zcsver.txt"
# get Zimbra LDAP password
ZIMBRA_LDAP_PASSWORD=`su - zimbra -c "zmlocalconfig -s zimbra_ldap_password | cut -d ' ' -f3"`

touch $ZCS_VER
echo $VERSION > $ZCS_VER

echo -e $ibold"Retrieve Zimbra User.............................."$ebold

grep "Release 5." $ZCS_VER
if [ $? = 0 ]; then
USERS=`su - zimbra -c 'zmprov gaa'`;
LDAP_MASTER_URL=`su - zimbra -c "zmlocalconfig -s ldap_master_url | cut -d ' ' -f3"`
fi

grep "Release 7." $ZCS_VER
if [ $? = 0 ]; then
USERS=`su - zimbra -c 'zmprov -l gaa'`;
LDAP_MASTER_URL="ldapi:///"
fi

echo -e $ibold"Processing account, please wait.............................."$ebold
# /* Proses insert account kedalam file hasil export */
for ACCOUNT in $USERS; do
NAME=`echo $ACCOUNT`;
DOMAIN=`echo $ACCOUNT | awk -F@ '{print $2}'`;
ACCOUNT=`echo $ACCOUNT | awk -F@ '{print $1}'`;
ACC=`echo $ACCOUNT | cut -d '.' -f1`

if [ $NAMA_DOMAIN == $DOMAIN ] ;
then
OBJECT="(&(objectClass=zimbraAccount)(mail=$NAME))"
dn=`/opt/zimbra/bin/ldapsearch -H $LDAP_MASTER_URL -w $ZIMBRA_LDAP_PASSWORD -D uid=zimbra,cn=admins,cn=zimbra -x $OBJECT | grep dn:`


displayName=`/opt/zimbra/bin/ldapsearch -H $LDAP_MASTER_URL -w $ZIMBRA_LDAP_PASSWORD -D uid=zimbra,cn=admins,cn=zimbra -x $OBJECT | grep displayName: | cut -d ':' -f2 | sed 's/^ *//g' | sed 's/ *$//g'`


givenName=`/opt/zimbra/bin/ldapsearch -H $LDAP_MASTER_URL -w $ZIMBRA_LDAP_PASSWORD -D uid=zimbra,cn=admins,cn=zimbra -x $OBJECT | grep givenName: | cut -d ':' -f2 | sed 's/^ *//g' | sed 's/ *$//g'`

userPassword=`/opt/zimbra/bin/ldapsearch -H $LDAP_MASTER_URL -w $ZIMBRA_LDAP_PASSWORD -D uid=zimbra,cn=admins,cn=zimbra -x $OBJECT | grep userPassword: | cut -d ':' -f3 | sed 's/^ *//g' | sed 's/ *$//g'`

cn=`/opt/zimbra/bin/ldapsearch -H $LDAP_MASTER_URL -w $ZIMBRA_LDAP_PASSWORD -D uid=zimbra,cn=admins,cn=zimbra -x $OBJECT | grep cn: | cut -d ':' -f2 | sed 's/^ *//g' | sed 's/ *$//g'`

initials=`/opt/zimbra/bin/ldapsearch -H $LDAP_MASTER_URL -w $ZIMBRA_LDAP_PASSWORD -D uid=zimbra,cn=admins,cn=zimbra -x $OBJECT | grep initials: | cut -d ':' -f2 | sed 's/^ *//g' | sed 's/ *$//g'`

sn=`/opt/zimbra/bin/ldapsearch -H $LDAP_MASTER_URL -w $ZIMBRA_LDAP_PASSWORD -D uid=zimbra,cn=admins,cn=zimbra -x $OBJECT | grep sn: | cut -d ':' -f2 | sed 's/^ *//g' | sed 's/ *$//g'`


if [ "$giveName" == "" ]; then
        echo "
dn: uid=$ACCOUNT,ou=people,dc=excellent,dc=co,dc=id
cn: $displayName
sn: $sn
uid: $ACCOUNT
objectClass: top
objectClass: inetOrgPerson
objectClass: posixAccount
gidNumber: 100
uidNumber: $vUID
homeDirectory: /home/$ACCOUNT
loginShell: /bin/bash
" >> $LDIF_FILE

echo "$dn
changetype: modify
replace: userPassword
userPassword:: $userPassword
" >> $MOD_FILE

else

                echo "
dn: uid=$ACCOUNT,ou=people,dc=excellent,dc=co,dc=id
cn: $displayName
givenName: $givenName
sn: $sn
uid: $ACCOUNT
objectClass: top
objectClass: inetOrgPerson
objectClass: posixAccount
gidNumber: 100
uidNumber: $vUID
homeDirectory: /home/$ACCOUNT
loginShell: /bin/bash
" >> $LDIF_FILE

echo "$dn
changetype: modify
replace: userPassword
userPassword:: $userPassword
" >> $MOD_FILE

fi

                echo "Adding account $NAME"
fi
let vUID=vUID+1
done
echo -e $ibold"All account has been exported sucessfully into $MOD_FILE and $LDIF_FILE..."$ebold

The script will produce two pieces of files : add.ldif and zcs-acc-acc-mod.ldif. The first one can be used for LDAP data input with the following command:
[/code lang="bash"]
ldapadd -Wx -D “cn=Administrator,dc=excellent,dc=co,dc=id” -H ldap://localhost -f acc-add.ldif
[/code]
Use the second file to match LDAP user password with an existing password in Zimbra
[/code lang="bash"]
ldapmodify -f zcs-acc-mod.ldif -x -H ldapi:/// -D "cn=Administrator,dc=excellent,dc=co,dc=id" -w PasswordLDAPServer
[/code]
If you wish to include another attribute or schema, simply edit the script and made necessary modification.

Tips : Improving Zimbra Mail Server Security with Fail2Ban

$
0
0

Zimbra mail server has it’s own anti spam based on SpamAssasin and anti virus addon based on ClamAV to block incoming and outgoing malicious. The default addon has a pretty good performance when configured properly, but if you want to increase the security of Zimbra mail server, fail2ban is an additional plugin to be considered.

What is Fail2Ban

Fail2ban is an intrusion prevention framework written in the Python programming language. It is able to run on POSIX systems that have an interface to a packet-control system or firewall installed locally (for example, iptables or TCP Wrapper).

Fail2ban operates by monitoring log files (e.g. /var/log/pwdfail, /var/log/auth.log, etc.) for selected entries and running scripts based on them. Most commonly this is used to block selected IP addresses that may belong to hosts that are trying to breach the system’s security. It can ban any host IP that makes too many login attempts or performs any other unwanted action within a time frame defined by the administrator.

Here is a guide to improve the security of Zimbra mail server by using Fail2Ban :

  1. Install Fail2Ban and IPtables. If you are using Minimal Server Appliance, both Fail2ban and IPtables has been successfully installed on the appliance. To install it manually, run the following command with root permission :
    zypper ar http://download.opensuse.org/repositories/security/SLE_11/ fail2ban
    zypper in fail2ban
    
  2. Create a new file /etc/fail2ban/filter.d/zimbra.conf. This file contains regular expression to parsing Zimbra log which will trigger the banned process if it happens several times in a specified time interval. Contents of /etc/fail2ban/filter.d/zimbra.conf :
    # Fail2Ban configuration file
    #
    # Author:
    #
    # $Revision: 1 $
    #
     
    [Definition]
     
    # Option:  failregex
    # Notes.:  regex to match the password failures messages in the logfile. The
    #          host must be matched by a group named "host". The tag "" can
    #          be used for standard IP/hostname matching and is only an alias for
    #          (?:::f{4,6}:)?(?P[\w\-.^_]+)
    # Values:  TEXT
    #
    failregex = \[ip=;\] account - authentication failed for .* \(no such account\)$
                            \[ip=;\] security - cmd=Auth; .* error=authentication failed for .*, invalid password;$
                            ;oip=;.* security - cmd=Auth; .* protocol=soap; error=authentication failed for .* invalid password;$
                            \[oip=;.* SoapEngine - handler exception: authentication failed for .*, account not found$
                WARN .*;ip=;ua=ZimbraWebClient .* security - cmd=AdminAuth; .* error=authentication failed for .*;$
                INFO .*ip=;ua=zclient.*\] .* authentication failed for \[.*\], (invalid password|account not found)+$
    #                        NOQUEUE: reject: RCPT from .*\[\]: 550 5.1.1 .*: Recipient address rejected:
     
    # .*\[ip=;\] .* - authentication failed for .* \(invalid password\)
    #
    # Option:  ignoreregex
    # Notes.:  regex to ignore. If this regex matches, the line is ignored.
    # Values:  TEXT
    #
    ignoreregex =
    
  3. Create/edit /etc/fail2ban/jail.conf with the following contents :
    # Fail2Ban configuration file
    #
    # Author: Cyril Jaquier
    #
    # $Revision: 747 $
    #
    
    # The DEFAULT allows a global definition of the options. They can be overridden
    # in each jail afterwards.
    
    [DEFAULT]
    
    # "ignoreip" can be an IP address, a CIDR mask or a DNS host. Fail2ban will not
    # ban a host which matches an address in this list. Several addresses can be
    # defined using space separator.
    ignoreip = 127.0.0.1/8 172.16.0.0/16 172.17.0.0/16
    
    # "bantime" is the number of seconds that a host is banned.
    bantime  = 600
    
    # A host is banned if it has generated "maxretry" during the last "findtime"
    # seconds.
    findtime  = 600
    
    # "maxretry" is the number of failures before a host get banned.
    maxretry = 3
    
    # "backend" specifies the backend used to get files modification. Available
    # options are "gamin", "polling" and "auto". This option can be overridden in
    # each jail too (use "gamin" for a jail and "polling" for another).
    #
    # gamin:   requires Gamin (a file alteration monitor) to be installed. If Gamin
    #          is not installed, Fail2ban will use polling.
    # polling: uses a polling algorithm which does not require external libraries.
    # auto:    will choose Gamin if available and polling otherwise.
    backend = auto
    
    
    # This jail corresponds to the standard configuration in Fail2ban 0.6.
    # The mail-whois action send a notification e-mail with a whois request
    # in the body.
    
    [ssh-iptables]
    
    enabled  = false
    filter   = sshd
    action   = iptables[name=SSH, port=ssh, protocol=tcp]
               sendmail-whois[name=SSH, dest=ms@vavai.com, sender=fail2ban@sungaibudi.com]
    logpath  = /var/log/messages
    maxretry = 5
    
    [proftpd-iptables]
    
    enabled  = false
    filter   = proftpd
    action   = iptables[name=ProFTPD, port=ftp, protocol=tcp]
               sendmail-whois[name=ProFTPD, dest=you@example.com]
    logpath  = /var/log/proftpd/proftpd.log
    maxretry = 6
    
    # This jail forces the backend to "polling".
    
    [sasl-iptables]
    
    enabled  = false
    filter   = sasl
    backend  = polling
    action   = iptables[name=sasl, port=smtp, protocol=tcp]
               sendmail-whois[name=sasl, dest=ms@vavai.com]
    logpath  = /var/log/zimbra.log
    
    # Here we use TCP-Wrappers instead of Netfilter/Iptables. "ignoreregex" is
    # used to avoid banning the user "myuser".
    
    [ssh-tcpwrapper]
    
    enabled     = false
    filter      = sshd
    action      = hostsdeny
                  sendmail-whois[name=SSH, dest=ms@vavai.com]
    ignoreregex = for myuser from
    logpath     = /var/log/messages
    
    # This jail demonstrates the use of wildcards in "logpath".
    # Moreover, it is possible to give other files on a new line.
    
    [apache-tcpwrapper]
    
    enabled  = false
    filter   = apache-auth
    action   = hostsdeny
    logpath  = /var/log/apache*/*error.log
               /home/www/myhomepage/error.log
    maxretry = 6
    
    # The hosts.deny path can be defined with the "file" argument if it is
    # not in /etc.
    
    [postfix-tcpwrapper]
    
    enabled  = false
    filter   = postfix
    action   = hostsdeny[file=/not/a/standard/path/hosts.deny]
               sendmail[name=Postfix, dest=you@example.com]
    logpath  = /var/log/postfix.log
    bantime  = 300
    
    # Do not ban anybody. Just report information about the remote host.
    # A notification is sent at most every 600 seconds (bantime).
    
    [vsftpd-notification]
    
    enabled  = false
    filter   = vsftpd
    action   = sendmail-whois[name=VSFTPD, dest=you@example.com]
    logpath  = /var/log/vsftpd.log
    maxretry = 5
    bantime  = 1800
    
    # Same as above but with banning the IP address.
    
    [vsftpd-iptables]
    
    enabled  = false
    filter   = vsftpd
    action   = iptables[name=VSFTPD, port=ftp, protocol=tcp]
               sendmail-whois[name=VSFTPD, dest=you@example.com]
    logpath  = /var/log/vsftpd.log
    maxretry = 5
    bantime  = 1800
    
    # Ban hosts which agent identifies spammer robots crawling the web
    # for email addresses. The mail outputs are buffered.
    
    [apache-badbots]
    
    enabled  = false
    filter   = apache-badbots
    action   = iptables-multiport[name=BadBots, port="http,https"]
               sendmail-buffered[name=BadBots, lines=5, dest=you@example.com]
    logpath  = /var/www/*/logs/access_log
    bantime  = 172800
    maxretry = 1
    
    # Use shorewall instead of iptables.
    
    [apache-shorewall]
    
    enabled  = false
    filter   = apache-noscript
    action   = shorewall
               sendmail[name=Postfix, dest=you@example.com]
    logpath  = /var/log/apache2/error_log
    
    # Ban attackers that try to use PHP's URL-fopen() functionality
    # through GET/POST variables. - Experimental, with more than a year
    # of usage in production environments.
    
    #[php-url-fopen]
    #
    #enabled = false
    #port    = http,https
    #filter  = php-url-fopen
    #logpath = /var/www/*/logs/access_log
    #maxretry = 1
    
    # A simple PHP-fastcgi jail which works with lighttpd.
    # If you run a lighttpd server, then you probably will
    # find these kinds of messages in your error_log:
    # ALERT – tried to register forbidden variable ‘GLOBALS’
    # through GET variables (attacker '1.2.3.4', file '/var/www/default/htdocs/index.php')
    # This jail would block the IP 1.2.3.4.
    
    [lighttpd-fastcgi]
    
    enabled = false
    port    = http,https
    filter  = lighttpd-fastcgi
    # adapt the following two items as needed
    logpath = /var/log/lighttpd/error.log
    maxretry = 2
    
    # This jail uses ipfw, the standard firewall on FreeBSD. The "ignoreip"
    # option is overridden in this jail. Moreover, the action "mail-whois" defines
    # the variable "name" which contains a comma using "". The characters '' are
    # valid too.
    
    [ssh-ipfw]
    
    enabled  = false
    filter   = sshd
    action   = ipfw[localhost=192.168.0.1]
               sendmail-whois[name="SSH,IPFW", dest=you@example.com]
    logpath  = /var/log/auth.log
    ignoreip = 168.192.0.1
    
    # These jails block attacks against named (bind9). By default, logging is off
    # with bind9 installation. You will need something like this:
    #
    # logging {
    #     channel security_file {
    #         file "/var/log/named/security.log" versions 3 size 30m;
    #         severity dynamic;
    #         print-time yes;
    #     };
    #     category security {
    #         security_file;
    #     };
    # };
    #
    # in your named.conf to provide proper logging.
    # This jail blocks UDP traffic for DNS requests.
    
    # !!! WARNING !!!
    #   Since UDP is connection-less protocol, spoofing of IP and imitation
    #   of illegal actions is way too simple.  Thus enabling of this filter
    #   might provide an easy way for implementing a DoS against a chosen
    #   victim. See
    #    http://nion.modprobe.de/blog/archives/690-fail2ban-+-dns-fail.html
    #   Please DO NOT USE this jail unless you know what you are doing.
    #
    # [named-refused-udp]
    #
    # enabled  = false
    # filter   = named-refused
    # action   = iptables-multiport[name=Named, port="domain,953", protocol=udp]
    #            sendmail-whois[name=Named, dest=you@example.com]
    # logpath  = /var/log/named/security.log
    # ignoreip = 168.192.0.1
    
    # This jail blocks TCP traffic for DNS requests.
    
    [named-refused-tcp]
    
    enabled  = false
    filter   = named-refused
    action   = iptables-multiport[name=Named, port="domain,953", protocol=tcp]
               sendmail-whois[name=Named, dest=ms@vavai.com]
    logpath  = /var/log/named/security.log
    ignoreip = 168.192.0.1
    
    [zimbra-account]
    enabled  = true
    filter   = zimbra
    action   = iptables-allports[name=zimbra-account]
               sendmail[name=zimbra-account, dest=ms@vavai.com]
    logpath  = /opt/zimbra/log/mailbox.log
    bantime  = 600
    maxretry = 5
     
    [zimbra-audit]
    enabled  = true
    filter   = zimbra
    action   = iptables-allports[name=zimbra-audit]
               sendmail[name=Zimbra-audit, dest=ms@vavai.com]
    logpath  = /opt/zimbra/log/audit.log
    bantime  = 600
    maxretry = 5
     
    [zimbra-recipient]
    enabled  = true
    filter   = zimbra
    action   = iptables-allports[name=zimbra-recipient]
                   sendmail[name=Zimbra-recipient, dest=ms@vavai.com]
    logpath  = /var/log/zimbra.log
    #findtime = 604800
    bantime  = 172800
    maxretry = 5
    
    [postfix]
    enabled  = true
    filter   = postfix
    action   = iptables-multiport[name=postfix, port=smtp, protocol=tcp]
               sendmail-buffered[name=Postfix, dest=ms@vavai.com]
    logpath  = /var/log/zimbra.log
    bantime  = -1
    maxretry = 5
    
    #[sasl]
    #enabled  = true
    #port     = smtp,ssmtp,imap2,imap3,imaps,pop3,pop3s
    #filter   = sasl
    # You might consider monitoring /var/log/warn.log instead
    # if you are running postfix. See http://bugs.debian.org/507990
    #logpath  = /var/log/zimbra.log
    

    jail.conf contains data log path to be check and email address for banned notification. Do not forget to fill in the parameters ignoreip to prevent Fail2Ban banned internal network

  4. Edit file /etc/fail2ban/action.d/sendmail.conf and change the line :
    Fail2Ban" | /usr/sbin/sendmail -f <sender> <dest>
    

    into

    Fail2Ban" | /opt/zimbra/postfix/sbin/sendmail -f <sender> <dest>
    
  5. Restart Fail2Ban services
    service fail2ban restart
    

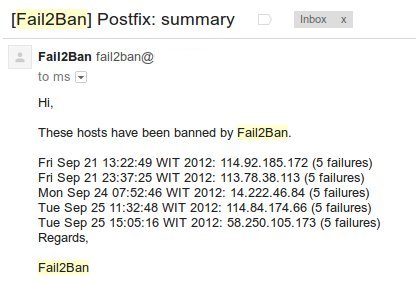
Fail2Ban will sent a notification email to specified email address if found intrusion that match with Fail2Ban rule. IP will be instantly banned if it has qualified many times and match with Fail2Ban rules in a predefined time interval. We can also modify jail.conf  or create another regular expression to check other logs.

Below are screenshot of notification email from Fail2Ban:

Fail2Ban is quite powerful and can be used to anticipate the kind of brute-force attack, both on email and other server services such as web servers, FTP servers, database servers and others.

Zimbra Mail Server Tips : Bulk Reset Account Password

$
0
0

Sometimes we may want to reset the user password for a while, such as setting up a new system or migration from the old mail server and want to clean up old password.

Below are a simple script to bulk-reset Zimbra account password :

#!/bin/bash
clear
USERS=`su - zimbra -c 'zmprov -l gaa'`;

for ACCOUNT in $USERS; do
ACC1=`echo $ACCOUNT | awk -F@ '{print $1}'`;
ACC=`echo $ACC1 | cut -d '.' -f1`;

if [ $ACC == "admin" ] || [ $ACC == "wiki" ] || [ $ACC == "galsync" ] || [ $ACC == "ham" ] || [ $ACC == "spam" ]; then
echo "Skipping system account, $NAME...";
else
echo "Modifying $ACCOUNT password...";
su - zimbra -c "zmprov sp $ACCOUNT NewGeneratedPassword";
su - zimbra -c "zmprov ma $ACCOUNT zimbraPasswordMustChange TRUE;
echo "Done!"
echo ""
# read anykey
fi
done
echo "Modifying password for all user has been finished successfully"

Note : I think it would be better to include some personal ID (part of user name or any fields) into generated-password so all password will be a semi-random password. In my case, I’m using user birth date or part of their name for their generated password to prevent anyone trying to login to any mailbox. It’s not really secure but in my case, it was sufficient for temporary purpose.

Zimbra Tips : PolicyD & Rate-Limit Sending Message Implementation on Zimbra 8

$
0
0

From PolicyD website : Policyd v2 (codenamed “cluebringer”) is a multi-platform policy server for popular MTAs. This policy daemon is designed mostly for large scale mail hosting environments. The main goal is to implement as many spam combating and email compliance features as possible while at the same time maintaining the portability, stability and performance required for mission critical email hosting of today. Most of the ideas and methods implemented in Policyd v2 stem from Policyd v1 as well as the authors’ long time involvement in large scale mail hosting industry.

PolicyD can be integrated into Zimbra to add an anti spam layer, especially for rate-limit sending message. We can set maximum messages both for receiving and sending policy and prevent mail server IP address to be blacklisted due to spam message to outside network.

vmware_zimbra_logoPolicyD activation procedure on Zimbra 8 is slightly different from the procedures on previous version. Some of  features on PolicyD include Access Control, amavis, CheckHelo, CheckSPF, Greylisting, Quotas and Accounting. The new features can be configured through the Web Administration Policyd as well as standard feature.

Below are PolicyD activation procedure on Zimbra 8, fully tested on Zimbra 8.0.6, the latest version of the time this article was written.

ACTIVATING POLICYD ADDON

su - zimbra
zmprov ms `zmhostname` +zimbraServiceInstalled cbpolicyd +zimbraServiceEnabled cbpolicyd
zmlocalconfig -e postfix_enable_smtpd_policyd=yes
zmprov mcf +zimbraMtaRestriction "check_policy_service inet:127.0.0.1:10031"

zmlocalconfig -e cbpolicyd_log_level=4; zmlocalconfig -e cbpolicyd_log_detail=modules,tracking,policies; zmlocalconfig -e cbpolicyd_module_accesscontrol=1 cbpolicyd_module_checkhelo=1 cbpolicyd_module_checkspf=1 cbpolicyd_module_greylisting=1 cbpolicyd_module_quotas=1

zmcontrol restart
exit

WEB UI ACTIVATION FOR POLICYD MANAGEMENT
Run the following command by using root permission

cd /opt/zimbra/httpd/htdocs/ && ln -s ../../cbpolicyd/share/webui

Modify file /opt/zimbra/cbpolicyd-2.1.0-beta/share/webui/includes/config.php (vi /opt/zimbra/cbpolicyd-2.1.0-beta/share/webui/includes/config.php) and mark a comment (#) to the line begining with: $DB_DSN and add the following code before line begining with : $DB_USER

$DB_DSN="sqlite:/opt/zimbra/data/cbpolicyd/db/cbpolicyd.sqlitedb";

Reload Web UI (http) service with the following command :

cd /srv/
wget -c http://devlabs.linuxassist.net/attachments/download/230/cluebringer-snapshot-2.1.x-201205100639.tar.gz
tar -zxvf cluebringer-snapshot-2.1.x-201205100639.tar.gz
cd cluebringer-snapshot-2.1.x-201205100639/webui/
cp *.php *.css /opt/zimbra/cbpolicyd/share/webui/
su - zimbra -c "zmapachectl restart"

Try to open PolicyD web management by accessing the following URL : http://IpAddressOfZimbra:7780/webui/index.php, the correct result should be similar as below :

policyD_webadmin

Zimbra Tips : How To Secure PolicyD Web Admin

$
0
0

On previous article : PolicyD and Rate Limit Sending Message Implementation on Zimbra 8,  we’ve installing and configuring PolicyD to prevent spam message to go to outside network (or to came into internal network).  Zimbra based mail server without PolicyD  can be blacklisted due to spam message sent by compromised account (account got hacked by attacker).

By default, PolicyD Web Admin  can be accesses from anywhere, including from outside or public network. From mail server security perspective, this method is highly not recommended, because attacker could modify  PolicyD on web admin and changes it or disable it to fit with their purposes. We can apply some method to limit the access as describe below :

Shutdown The Apache Service

This is the easiest way to prevent access by turn off Apache web service used by PolicyD Web Admin

su - zimbra -c "zmapachectl stop"

If you need to modify an existing policy, just turn on the services :

su - zimbra -c "zmapachectl start"

policyd_logoCreating Firewall/Block Port 7780

PolicyD web admin using port 7780. Set the firewall to limit the access and set to be accessible from a specific IP address only.

Using Authentication

We can use web authentication and configure .htaccess to limit access into PolicyD web admin. Only authenticated user can access web admin.

  • Move to the webui cbpolicyd directory
cd /opt/zimbra/cbpolicyd-2.1.0-beta/share/webui
  • Move to the webui cbpolicyd directory
touch .htaccess
vi .htaccess

the contents of .htaccess should looks like this :

AuthUserFile /opt/zimbra/cbpolicyd-2.1.0-beta/share/webui/.htpasswd
AuthGroupFile /dev/null
AuthName "User and Password"
AuthType Basic
require valid-user
  • create a htpasswd file, username and password
touch .htpasswd
htpasswd -c .htpasswd cbpadmin

or

htpasswd2 -c .htpasswd cbpadmin

Edit /opt/zimbra/conf/httpd.conf and append the following line on the bottom of file :

Alias /webui /opt/zimbra/cbpolicyd-2.1.0-beta/share/webui/
# Comment out the following 3 lines to make web ui accessible from anywhere
AllowOverride AuthConfig
Order Deny,Allow
Allow from all
  • Restart the apache zimbra service
su - zimbra -c "zmapachectl restart"

Try to reopen Web Admin PolicyD, it should provide authentication login. Login with cbpadmin username and password provided on the above step.

Zimbra Tips : Rate-Limit Sending Message with PolicyD

$
0
0

Previous Article :

  1. Zimbra Tips : Installing & Configuring PolicyD on Zimbra 8
  2. Zimbra Tips : Securing PolicyD Web Admin

After installing, configuring and securing PolicyD, we can apply some policy rule on PolicyD, such as setting up maximum number of emails that can be sent by any account in a certain time interval. For example, each user can only send a maximum of 300 emails per hour, so if there are some compromised account they cannot send email beyond the limit.

policyd_logo

CONFIGURING POLICY

  1. Open the Administration Web PolicyD page, http://lpServerZimbra:7780/webui/index.php
  2. Select Quotas | Configure menu
  3. In the Action options, select Add and enter the details as below :
    Name : Delivery Per User
    Track : Select Sender@domain. This means that policy will be applies to each user on the domain
    Period : The length of time that given in seconds. Ideally is in counts per hour or 3600 seconds
    Link to policy : Select Default
    Verdict : The rules that will be apply if it meets the period, such as defer (hold the messages until next time interval)
    Data : Information that is given if it meets the rule, for example the information is a “Maximum 2 email delivery per minute” or “Maximum 300 emails delivery  per hour
    Stop processing here : choose Yes, means that rule will not processing another rule
    Comment : can be filled with anything you like
    vavai-setting-up-policyd-rule
  4. Click Submit
  5. by default, the newly created rule set in the disabled state. Set it enable by choose PolicyD that you just created, and then on the Action option, select change
    vavai-enable-policyd-rule
  6. Change the parameter Disable=’Yes’ to Disable=’No’ on the Disabled option and click submit
  7. Select the newly created policy again  and then select Limits on the Action option
  8. Select Add, then select the Message Count and fill in with the number of maximum emails  on Counter Limit
    vavai-set-policyd-rule-limits
  9. Click Back to Limits and choose the rule that you have just created. Select Change In the Action option
  10. Change the parameter ‘Yes’ to ‘No’ on the Disabled option and click submit

Try to send emails beyond the limit. On the above screenshot, I’ve set maximum 2 emails for each user per minute. This is for example only so it wasn’t too long to see match condition for the above rule. for production use, better to set maximum emails limit  per hour rather than per minutes, to consider the possibility email in CC or BCC which also counted as a single email.

The following is an example screenshot while PolicyD block email from being sent because because the sender has exceeded the maximum limit of sending email quota.

How to Build an Anti Spam Appliance Using Untangle-Part 1

$
0
0

This article is intended as a glowing article. Its contents are part of the training material on my startup company, PT. Excellent Infotama Kreasindo for the subject “Security Hardening &  Improving Mail Server Performance”. Training utilize Untangle as its base system for anti spam appliance.

*****

The person examines email signWHAT IS ANTI SPAM APPLIANCE ?
Anti spam appliance is a system (can be based on Linux, Windows, FreeBSD ) that has a mail server security functions . In some products, anti spam is one module from main functions of the UTM (Unified Threat Management ). Anti spam appliance can be installed in the form of software and hardware. Some UTM / anti- spam appliance that is quite popular among other things are :

  1. Cisco IronPort
  2. Fortigate Fortimail
  3. Astaro
  4. Symantec Brightmail
  5. Juniper Networks
  6. Cyberoam
  7. Check Point
  8. Barracuda
  9. etc. :-)

Anti spam appliance licensing  price are usually calculated based on the number of users and is calculated per year (can be multi -year depending on the calculation mechanism of each vendor) . There is also a UTM appliance that has a lot of modules , but the module is determined by the activation of the purchased license. For example, if you buy the license  for  web filter only and does not include an email filter, UTM can only protect your web and not for mail server even though it actually has a feature for that.

In addition to using a hardware appliance, we can also use other products, mainly in the form of software at a lower price. Software appliance are much cheaper because it does not include hardware and usually licensed based on the number of server/modul, not by the number of user. Untangle is best example for this kind of appliance (although Untangle also provided hardware appliance for some country).

WHAT IS UNTANGLE ?

Untangle is a software -based network gateway built from Debian Linux to secure the network . Since the end of 2013 , Untangle split their product into 2 products line : Untangle NG ( Next Generation )  Firewall and Untangle IC (Internet Control) . We will  discus Untangle NG Firewall for anti spam appliance.

vavai-untangle
Features of Untangle

  • Web Filter
  • Spam Blocker
  • Application Control
  • Virus Blocker
  • Spyware Blocker
  • Phish Blocker
  • Intrusion Prevention
  • Attack Blocker
  • Firewall
  • Open VPN
  • Captive Portal
  • Ad Blocker
  • Reports

Our engineers test several anti-spam software  and Untangle eventually be an option due to  the following consideration :

  1. Easy to install
  2. Provides a variety of free features
  3. Paid Feature  are modular, can choose some specific modules and disable the features that are not required
  4. Can be set as an anti- spam appliance with a few brief setting, goal of this article :-)
  5. Proven reliable based on personal experience :-)
  6. Appliance can be installed above or directly on a physical computer
  7. Has the complete functions , including remote access option by Untangle engineer for premium license

untangle-spam-blocker-feature

Based on our test results on the production server for 1 month usage, the total incoming email approximately 1 million emails and Untangle kick about 800 thousand spam emails . Due to the information page on their website, Untangle claims its accuracy detection rate are about 97% of the total incoming spam. Beware : the result may varies due to many factor, please try it to obtain the actual result.

Although most of our deployment are for protecting Zimbra mail server, Untangle can be deploys with with Microsoft Exchange Server, MDaemon , Lotus Domino and others.

In the next article we will discuss about the installation and configuration procedures for preparing Untangle as an anti spam appliance.


Zimbra Tips : Enabling Accounting Module on PolicyD

$
0
0

One of the modules provided by PolicyD is Accounting module. Accounting module has similar  function as the Quota module that performs the Message Count Limit Counter or Message Cumulative Size in email. The differences between them are in in the policy period. Accounting module divided into three periods : Daily, Weekly dan Monthly. One example of the use of accounting module in PolicyD is to restrict sending mail from a particular user to a maximum of 100 thousand emails per month.

Accounting module supported on PolicyD since version r343 (v2.1.0). This module supports message count and message cumulative size over a fixed period of time. Message counters can be based on (Tracked) depending on sender, recipient or sender IP.

On previous tutorial : Zimbra Tips : Rate-Limit Sending Message With Policyd, Accounting module is not activated by default. Below is a tutorial on the procedure for activation of the accounting module in PolicyD.

policyd_logo

cd /opt/zimbra/cbpolicyd/share/database/
./convert-tsql sqlite accounting.tsql > /tmp/accounting.sql
vi /tmp/accounting.sql

On accounting sql file, remove all line starting with hash/comment tag (#) and then save.

Login as the Zimbra user and enable Accounting modules PolicyD

su - zimbra
zmlocalconfig -e cbpolicyd_module_accounting=1
vi /opt/zimbra/conf/cbpolicyd.conf.in

Edit the section ‘Modules to Load’ to be like this :

# Modules to load
modules=<

and contents on the bottom gonna be like this :

[AccessControl]
enable=@@cbpolicyd_module_accesscontrol@@

[Accounting]
enable=@@cbpolicyd_module_accounting@@

[Greylisting]
enable=@@cbpolicyd_module_greylisting@@

[CheckHelo]
enable=@@cbpolicyd_module_checkhelo@@

[CheckSPF]
enable=@@cbpolicyd_module_checkspf@@

[Quotas]
enable=@@cbpolicyd_module_quotas@@

Inject the newly converted accounting database

sqlite3 /opt/zimbra/data/cbpolicyd/db/cbpolicyd.sqlitedb < /tmp/accounting.sql

Restart Service PolicyD

zmcbpolicydctl restart

Next you can use the PolicyD web admin to enable accounting module and applying some restriction.

Zimbra Tips : Script to Check Mailbox Usage for Each User

$
0
0

Yesterday,  a friend of mine  asked me how to take all  data usage for each Zimbra user  for information and reporting purpose. Actually, all information about how many  mailboxes usages for each user on Zimbra Mail Server,  can be seen on the  Zimbra Admin | Server Statistics | Mailbox Quota.

zimbra-logoYou can see total quota and the quota already in use for each user. Although quite informative, it is not really flexible if we would like to use the data for other purposes. We must re-write the existing information or make a screenshot which will be difficult to be done if Zimbra has a large account.

To resolve this issue, we can utilize  Zimbra CLI and then create a small script  to find out how many mailboxes and the total quota usage for each user. Here’s an example of the command line :

su – zimbra

zmmailbox -z -m ahmad.iman@excellent.co.id gms

Command Line to see the total mailboxes

su - zimbra
zmprov ga vivianchow@excellent.co.id | grep zimbraMailQuota

From the  above example, we can create a simple script to looping all user mailbox and retrieve information about mailbox quota

vi /srv/quota-used.sh

paste the following code to the file you just created

#!/bin/bash
echo "Username           Total Quota         Usage"

zmprov -l gaa | while read ACCOUNT
 do
        QUOTA_TOTAL=`zmprov ga ${ACCOUNT} | grep "zimbraMailQuota" | cut -d ":" -f2`
        QUOTA_USAGE=`zmmailbox -z -m ${ACCOUNT} gms`
        echo "${ACCOUNT}    ${QUOTA_TOTAL}    ${QUOTA_USAGE}"
done

give executable permissions and run by using Zimbra permission

chmod +x /srv/quota-used.sh
su - zimbra
sh /srv/quota-used.sh

The above script  can be modified so that the result can be opened as csv file. Good luck and hopely it can be useful :D

Zimbra Tips : Delivery Restriction to Specific User/Distribution List With PolicyD

$
0
0

Related tutorial :

  1. Zimbra Tips : Policyd & Rate-Limit Sending Message Implementation On Zimbra 8
  2. Zimbra Tips : Securing PolicyD Web Admin
  3. Zimbra Tips : Rate-Limit Sending Message With PolicyD
  4. Zimbra Tips : Enabling Accounting Module On PolicyD

On previous tutorial, we’ve done the installation and configuration to restrict email sending per user by using the quota module, enabling accounting module and securing web admin access. Here we will discuss another PolicyD modules to increase Zimbra mail security by using Access Control module. Access control module is used to perform the control of the user/domain rights, such as preventing user from receiving emails, sending emails and others restriction policy.

policyd_logoOn the production server, I’m using Access control module to determine which user is allowed to send an email to distribution list. By default, Zimbra distribution list or group list can receive email from anywhere. This can be dangerous because it could be a target  of spam attacks.

Actually, the restriction on the distribution list can be done by doing a little bit of tuning on Postfix configuration. By using PolicyD, those settings can be done easily, considering the presence of Policyd Web Admin for configuration.

EXAMPLE SETTING

List of user/domain that allowed to send email to distribution list :

vivianchow@excellent.co.id
zezevavai@excellent.co.id
vavai.net

Distribution List :

team-support@excellent.co.id
team-sales@excellent.co.id

POLICYD WEB ADMIN CONFIGURATION

Log in to the Web Admin PolicyD  : http://IpAddressZimbra:7780/webui/index.php. if you can not accessing PolicyD web admin, make sure Apache services is running on Zimbra. if apache service status in the stop state, start it by using the following command :

su - zimbra
zmapachectl restart

Once you logged in into web admin, select the Policy menu | Groups and then create a User_Allow group and Distribution_List and tall its members :

Policy Group

vavai-zimbra-restrict-recipient-by-using-policyd1

User_Allow Group Member

vavai-zimbra-restrict-recipient-by-using-policyd2

Distribution List Group Member

vavai-zimbra-restrict-recipient-by-using-policyd3

after all the group and its members is made,, create a Policy for the group. Select the Policies menu | Main then create a rule/policy with the same name distributionlist_allow and distributionlist_deny along with its members

Main Policy

vavai-zimbra-restrict-recipient-by-using-policyd4

See that on  the above example, Priority is zero (0) and one (1). Priority is influential as well as the MX records in the DNS. The smaller priority means the most preferred usage in policy.

Members of Main distributionlist_allow

vavai-zimbra-restrict-recipient-by-using-policyd5

Members of distributionlist_deny

vavai-zimbra-restrict-recipient-by-using-policyd6

The final stage is to control the policies that already been made. Select the Access Control | Configure and create 2 pieces of control like the example below :

vavai-zimbra-restrict-recipient-by-using-policyd7

Test the policies by  sending an email to distribution list using the banned user and the allowed user and check the result. Good luck and hopely this can be useful :D

Zimbra Collaboration Suite Urgent Patch Releases (Exploit-DB)

$
0
0

zimbra-logoLast week, Zimbra issued patch releases for Zimbra Collaboration 8.x and 7.x, resolving two critical security vulnerabilities. It’s strongly recommend that any customer running the following versions of Zimbra Collaboration apply the patches:

8.0.5, 8.0.4, 8.0.3
7.2.5, 7.2.4, 7.2.3, 7.2.2

These issues are being tracked in Zimbra Bugzilla systems as the following:

Bug # 80338
Summary: Privilege Escalation via LFI
Affected Versions: 7.2.2 and 8.0.2 and all previous releases

Bug # 84547
Summary: Critical Security Vulnerability
Affected Versions: 7.2.5 and 8.0.5 and all previous releases

The official patch downloads and release notes can be found here: Network Edition Downloads: Enterprise Messaging and Collaboration Software by Zimbra or for Open Source Edition : Binary Archive for Open Source Editions

Please follow the release notes for installation instructions. Each patch release is a cumulative update, including any fixes from previous patch releases for that version.

More Details :

Bug 80338 (Feb 2013) is a Local File Inclusion vulnerability that leads to potential Privilege Escalation:

Bug 84547 is a newer Critical Security Vulnerability (Dec 2013) that has not had further details released (in order to protect other customers):

There is great urgency for getting this patched on your platform, as there is an exploit for Bug 80338 in the wild, discussed here:

And it has been used to install upload rogue Zimlets and bitcoin mining processes (and potentially others) on some customer systems. You can read about the clean-up steps for this here:

As noted, there are patches and upgrades available here:

Please let us know if further questions. Please upgrade or patch at first opportunity. Sorry for the difficulties on this.

I strongly recommend to upgrading all Zimbra version 7.x.x into 7.2.6 and 8.x.x into 8.0.6 if possible. If you can not perform an update in the near future, please go with the above update releases ( only need a few steps than upgrading all services). Based on experience, upgrading Zimbra 6.0.8 in SLES 11 SP1 64 bit into 8.0.6 are worked flawlessly with only a few library update (zlib library). I’ll be post the details later on next tutorial ;-)

Zimbra Improvement : Restricted Sender/Sender Must Login on Zimbra 8

$
0
0

emailAs a powerful mail server, Zimbra has some system security features applied by default. We can also applying some additional security policy to increase mail server protection, such as applying PolicyD and Fail2Ban

All the above security rule may be sufficient, but there are some additional security tips should be considered, especially in the case of SMTP authorization.

Look at the following mail flow delivery, sent from or into Zimbra :

From : External User   To : External User, Result : Relay Access Denied

telnet mail.mycompanydomain.co.id 25
Trying 103.XXX.XXX.XXX...
Connected to mail.mycompanydomain.co.id.
Escape character is '^]'.
220 mail.mycompanydomain.co.id ESMTP Postfix
ehlo mail
250-mail.mycompanydomain.co.id
250-PIPELINING
250-SIZE 51200000
250-VRFY
250-ETRN
250-STARTTLS
250-ENHANCEDSTATUSCODES
250-8BITMIME
250 DSN
mail from:vivianchow@yahoo.com
250 2.1.0 Ok
rcpt to:zezevavai@gmail.com
554 5.7.1 <zezevavai@gmail.com>: Relay access denied

From : External User   To : Zimbra User, Result : Accepted with prior Scanning for Spam and Viruses

telnet mail.mycompanydomain.co.id 25
Trying 103.XXX.XXX.XXX...
Connected to mail.mycompanydomain.co.id.
Escape character is '^]'.
220 mail.mycompanydomain.co.id ESMTP Postfix
ehlo mail
250-mail.mycompanydomain.co.id
250-PIPELINING
250-SIZE 51200000
250-VRFY
250-ETRN
250-STARTTLS
250-ENHANCEDSTATUSCODES
250-8BITMIME
250 DSN
mail from:vivianchow@yahoo.com
250 2.1.0 Ok
rcpt to:myemail@mycompanydomain.co.id
250 2.1.5 Ok
data
354 End data with <CR><LF>.<CR><LF>
Hello Vavai
.
250 2.0.0 Ok: queued as C78EDB6E001
quit
221 2.0.0 Bye

From : Zimbra User  To : External User, Result : Accepted with prior SMTP Authorization check

Zimbra should be respond our request  with “Relay Access Denied when trying to send emails without prior authorization

telnet mail.mycompanydomain.co.id 25
Trying 103.XXX.XXX.XXX...
Connected to mail.mycompanydomain.co.id.
Escape character is '^]'.
220 mail.mycompanydomain.co.id ESMTP Postfix
ehlo mail
250-mail.mycompanydomain.co.id
250-PIPELINING
250-SIZE 6144000
250-VRFY
250-ETRN
250-ENHANCEDSTATUSCODES
250-8BITMIME
250 DSN
mail from:vivianchow@mycompanydomain.co.id
250 2.1.0 Ok
rcpt to:myemail@gmail.com
554 5.7.1 <myemail@vavai.com>: Relay access denied

From : Zimbra User  To : Zimbra User, Result : Accepted WITHOUT prior SMTP Authorization check

telnet mail.mycompanydomain.co.id 25
Trying 103.XXX.XXX.XXX...
Connected to mail.mycompanydomain.co.id.
Escape character is '^]'.
220 mail.mycompanydomain.co.id ESMTP Postfix
ehlo mail
250-mail.mycompanydomain.co.id
250-PIPELINING
250-SIZE 6144000
250-VRFY
250-ETRN
250-ENHANCEDSTATUSCODES
250-8BITMIME
250 DSN
mail from:vivianchow@mycompanydomain.co.id
250 2.1.0 Ok
rcpt to:vivianchow@mycompanydomain.co.id
250 2.1.5 Ok

zimbra-logoLook at the last example. I’m trying to send email from vivianchow@mycompanydomain.co.id to vivianchow@mycompanydomain.co.id without prior authorization and Zimbra accepted this email whereas should not. How if I’m trying to send fake email, let’s say from my boss email into my colleagues?

To prevent the above security hole, below are some modification which are able to be applied on Zimbra 8. This modification will force the user to authenticate and login before sending an email to an internal users.

  1. Backup all configuration. Incorrect settings while applying “sender must login” policy would interfere Zimbra services and would stop your email communication
  2. Log in as Zimbra user and edit /opt/zimbra/conf/zmconfigd.cf
    Add the following lines right under POSTCONF smtpd_recipient_restrictions FILE zmconfigd/postfix_recipient_restrictions.cf
    POSTCONF proxy_read_maps FILE zmconfigd/proxy_read_maps.cf

    and add the following lines right under POSTCONF smtpd_sender_restrictions FILE zmconfigd/smtpd_sender_restrictions.cf

    POSTCONF smtpd_sender_login_maps proxy:ldap:/opt/zimbra/conf/ldap-slm.cf
  3. Save your changes and then navigate to /opt/zimbra/conf/zmconfigd/ folder and edit smtpd_sender_restriction.cf
    cd /opt/zimbra/conf/zmconfigd/
    vi smtpd_sender_restrictions.cf
  4. Put the following code on the top of the lines
    permit_mynetworks, reject_sender_login_mismatch
  5. Save your change
  6. Check your read maps settings with the following command :
    postconf | grep proxy_read_maps
  7. On my Zimbra 8, the result would shown as below
    $local_recipient_maps $mydestination $virtual_alias_maps $virtual_alias_domains $virtual_mailbox_maps $virtual_mailbox_domains $relay_recipient_maps $relay_domains $canonical_maps $sender_canonical_maps $recipient_canonical_maps $relocated_maps $transport_maps $mynetworks $smtpd_sender_login_maps $sender_bcc_maps $recipient_bcc_maps $smtp_generic_maps $lmtp_generic_maps $alias_maps
  8. Create a proxy_read_maps.cf file
    vi proxy_read_maps.cf

    and add proxy:ldap:/opt/zimbra/conf/ldap-slm.cf on the last line of postconf result, so the result is supposedly like this:

    $local_recipient_maps $mydestination $virtual_alias_maps $virtual_alias_domains $virtual_mailbox_maps $virtual_mailbox_domains $relay_recipient_maps $relay_domains $canonical_maps $sender_canonical_maps $recipient_canonical_maps $relocated_maps $transport_maps $mynetworks $smtpd_sender_login_maps $sender_bcc_maps $recipient_bcc_maps $smtp_generic_maps $lmtp_generic_maps $alias_maps, proxy:ldap:/opt/zimbra/conf/ldap-slm.cf
  9. Navigate to /opt/zimbra/conf and create ldap-slm.cf file
    cd /opt/zimbra/conf
    grep server_host /opt/zimbra/conf/ldap-vam.cf
    grep bind_pw /opt/zimbra/conf/ldap-vam.cf
    vi ldap-slm.cf
  10. Content of ldap-slm.cf file
    server_host = ldap://HOST:389
    server_port = 389
    search_base =
    query_filter = (&(|(zimbraMailDeliveryAddress=%s)(zimbraMailAlias=%s)(zimbraMailCatchAllAddress=%s)(mail=%s))(zimbraMailStatus=enabled))
    result_attribute = zimbraMailDeliveryAddress,zimbraMailForwardingAddress,zimbraPrefMailForwardingAddress,zimbraMailCatchAllForwardingAddress,uid
    version = 3
    start_tls = yes
    tls_ca_cert_dir = /opt/zimbra/conf/ca
    bind = yes
    bind_dn = uid=zmpostfix,cn=appaccts,cn=zimbra
    bind_pw = PASSWORD
    timeout = 30
  11. Replace server_host  and bind_pw with the result of grep command
  12. Save all changes and then run the postfix reload to apply the changes
    chown zimbra:postfix ldap-slm.cf
    postfix reload
  13. Test the policy by telnet to your Zimbra server and send an email from internal to internal users without prior authorization
    telnet mail.mycompanydomain.co.id 25
    Trying XXX.XXX.XXX.XXX...
    Connected to mail.mycompanydomain.co.id.
    Escape character is '^]'.
    220 mail.mycompanydomain.co.id ESMTP Postfix
    ehlo mail
    250-mail.mycompanydomain.co.id
    250-PIPELINING
    250-SIZE 51200000
    250-VRFY
    250-ETRN
    250-STARTTLS
    250-ENHANCEDSTATUSCODES
    250-8BITMIME
    250 DSN
    mail from:vivianchow@mycompanydomain.co.id
    250 2.1.0 Ok
    rcpt to:vivianchow@mycompanydomain.co.id
    553 5.7.1 vivianchow@mycompanydomain.co.id: Sender address rejected: not logged in

Notes : Please backup all configuration before trying to set the “Sender must login” policy to prevent  unexpected things :-)

Viewing all 40 articles
Browse latest View live